15 Easy DIY Halloween Crafts That Are Spooky, Cute, and Budget-Friendly

This website contains affiliate links. Some products are gifted by brands for testing purposes. As an Amazon Associate, I earn from qualifying purchases. Some of the content on this site was created with the help of AI.

Halloween is the perfect time to bring some festive spirit to your home — the fun (and slightly spooky) way! Whether you’re hosting a Halloween party, decorating your porch for trick-or-treaters, or just want to add some seasonal charm, these DIY crafts are easy, budget-friendly, and ridiculously fun. From bats and ghosts to skeletons and pumpkins, these projects bring all the classic Halloween vibes with a fresh, Pinterest-worthy twist.

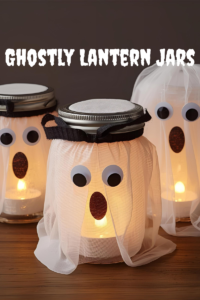
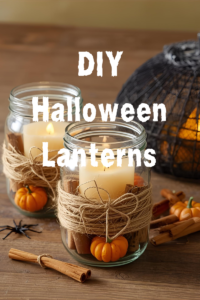
1. Pumpkin Patch Candle Holders

If fall had a scent, it would be pumpkin spice — and these pumpkin patch candle holders bring that cozy vibe right into your home. They’re rustic, charming, and look like something you’d find at a farmhouse market, but you can whip them up in less than an hour. Perfect for a Halloween party centerpiece or a cozy night in with hot cider.

What You Might Need:

How-To Steps:

  1. Place a candle in the center of your jar.

  2. Surround it with mini pumpkins and cinnamon sticks.

  3. Wrap raffia or twine around the mouth of the jar.

  4. Light and enjoy the warm autumn glow.

Picture This:
Your dining table glowing with rustic candle jars, the scent of cinnamon and pumpkin spice in the air. It’s like a tiny pumpkin patch right in your living room.

1. Ghostly Lantern Jars

If you only do one Halloween craft this year, let it be this one. These ghostly lantern jars are the perfect mix of eerie and adorable — like Casper meets cottagecore. They’re low-effort, high-impact, and insanely photogenic. You can make a whole spooky squad in under 30 minutes using stuff you probably already have at home. And when the lights go down? These glowing little spirits will make your windows, porch, or mantle look straight-up enchanted.

What You Might Need:

How-To Steps:

  1. Wrap gauze around your mason jar.

  2. Glue on eyes (or cut out felt for eyes and a mouth).

  3. Pop a tea light inside and watch them glow!

Picture This:
A row of ghost lanterns flickering softly on your windowsill, their gauzy faces glowing from within. They look like friendly spirits floating in the night — totally Pinterest-worthy.


3. Spooky Spider Web Balloons

Want a Halloween decoration that makes people go “ooooh” without draining your wallet? These spider web balloons are creepy, crawly, and crazy easy. They’re perfect for hanging above a snack table or using in a photo backdrop. Bonus: kids love making them too!

What You Might Need:

How-To Steps:

  1. Blow up balloons and tie securely.

  2. Wrap yarn loosely around each balloon to create a web effect.

  3. Attach plastic spiders to the yarn with glue or tape.

  4. Hang them from the ceiling or scatter around your party area.

Picture This:
Floating balloons wrapped in spider webs, with little spiders dangling like they just crawled out of a haunted attic. The perfect mix of spooky and playful.


4. Haunted House Silhouette Windows

Turn your home into the spookiest on the block with this easy window hack. Haunted house silhouettes add instant drama and mystery to your décor — no expensive props needed. It’s basically like making your own giant shadow puppets for Halloween.

What You Might Need:

  • Black poster board or construction paper

  • Scissors and tape

  • White bedsheet (optional, for diffusing light)

  • String lights or a lamp

How-To Steps:

  1. Cut out spooky shapes: haunted houses, bats, witches, or cats.

  2. Tape them to the inside of your window.

  3. Place a light source behind them (lamp or string lights).

  4. Add a white sheet if you want a softer glow.

Picture This:
From the outside, neighbors see glowing haunted houses with bats swooping overhead. It looks like you hired a professional Halloween decorator, but really it’s just some poster board and clever lighting.


5. Candy Corn Flower Pots

Love it or hate it, candy corn is a Halloween classic. These candy corn flower pots are cheerful, budget-friendly, and make a sweet spot for fall mums, herbs, or even wrapped treats. They’re great for porches or as teacher/neighbor gifts.

What You Might Need:

  • Terracotta flower pots

  • Acrylic paint (white, orange, yellow)

  • Paintbrushes

  • Clear sealant (optional, for outdoor use)

How-To Steps:

  1. Paint the bottom third of your pot yellow.

  2. Paint the middle section orange.

  3. Leave the top white, or paint white if needed.

  4. Seal with a clear coat if placing outside.

Picture This:
Rows of candy corn pots filled with bright fall flowers, sitting on your porch steps. They’re festive, cheerful, and scream “Halloween is here!” without being too spooky.

6. Glow-in-the-Dark Mason Jar Lanterns


Light up your night with a magical Halloween glow! These lanterns are simple, safe, and give your porch or bedroom a spooky-cute vibe.

What You Might Need:

  • Mason jars

  • Glow-in-the-dark paint

  • Black cardstock

  • Tea lights or battery-operated LED candles

How-To Steps:

  1. Paint the inside of the jars with glow-in-the-dark paint and let dry.

  2. Cut out Halloween shapes (bats, witches, cats) from black cardstock.

  3. Stick the cutouts to the jars.

  4. Place tea lights inside and watch them glow!

Picture This:
A row of glowing jars casting eerie shadows of bats and witches across your porch—perfect for trick-or-treaters and cozy fall nights.

7. Creepy Crawly Cupcake Toppers


Turn ordinary cupcakes into spine-chilling treats! Quick, fun, and a hit with kids and adults alike.

What You Might Need:

  • Mini cupcakes

  • Black licorice strings

  • Candy eyes

  • Frosting

How-To Steps:

  1. Frost cupcakes in your favorite Halloween colors.

  2. Twist licorice into spider legs and stick them around a candy eye in the center.

  3. Place on top of the cupcakes.

Picture This:
Cupcakes topped with tiny spiders staring up at you—it’s adorable and creepy at the same time.


8. Haunted House Silhouette Window Clings


Give your windows a haunted makeover that’s easy to remove when the season ends.

What You Might Need:

  • Black construction paper

  • Clear contact paper

  • Scissors

How-To Steps:

  1. Cut out haunted house shapes and spooky silhouettes from black paper.

  2. Stick them onto contact paper.

  3. Press onto your windows for instant Halloween drama.

Picture This:
Shadowy haunted houses lining your windows, casting eerie shapes as sunlight or porch lights hit them.


9. Witch Hat Ring Toss Game


Make party games festive and fun with a DIY twist!

What You Might Need:

  • Small cones or party hats

  • Black cardstock or paint

  • Paper plates

  • Rings or glow sticks

How-To Steps:

  1. Decorate cones or hats to look like witches’ hats.

  2. Place them upside-down on the plates.

  3. Toss rings from a distance—points for landing them on the hats!

Picture This:
A table full of tiny witches’ hats and kids trying to land rings, laughter and competition in full swing.


10. Monster Sock Puppets


Crafty, fun, and a little silly—perfect for Halloween storytelling.

What You Might Need:

  • Old socks

  • Googly eyes

  • Felt in bright colors

  • Glue and scissors

How-To Steps:

  1. Slip a sock over your hand.

  2. Glue googly eyes and felt teeth, arms, or horns.

  3. Use them to tell Halloween stories or put on a puppet show.

Picture This:
A row of colorful monsters ready to scare—or make everyone laugh!


11. Ghostly Paper Lanterns


Float some friendly—or spooky—ghosts around your home in minutes.

What You Might Need:

  • White paper lanterns

  • Black marker

  • Fishing line

How-To Steps:

  1. Draw ghost faces on the lanterns.

  2. Hang them with fishing line from the ceiling.

  3. Add battery-powered lights inside for an ethereal glow.

Picture This:
A ceiling full of floating ghosts, gently swaying as if drifting through the room.


12. Pumpkin Candle Holders


Tiny pumpkins make the cutest votive holders for fall and Halloween.

What You Might Need:

  • Mini pumpkins

  • Small tea lights

  • Knife or scoop

How-To Steps:

  1. Cut a hole in the top of each pumpkin.

  2. Scoop out seeds and flesh.

  3. Place a tea light inside.

Picture This:
A table lined with tiny pumpkins flickering, glowing, and adding instant seasonal charm.


13. Eyeball Garland


Creep your guests out just a little with this fun DIY garland.

What You Might Need:

  • Ping pong balls or white foam balls

  • Markers or paint

  • String or ribbon

How-To Steps:

  1. Draw creepy eyeballs on each ball.

  2. Thread balls onto string or ribbon.

  3. Hang across mantels, doors, or walls.

Picture This:
Eyeballs staring in every direction, giving your party a quirky, spooky vibe.


14. Candy Corn Mason Jar Treats

Sweet, simple, and seasonal—perfect for gifts or party favors.

What You Might Need:

  • Clear mason jars

  • Candy corn

  • Ribbon or twine

  • Mini labels

How-To Steps:

  1. Layer candy corn in jars for the classic orange, yellow, and white look.

  2. Tie ribbon around the top.

  3. Add a fun Halloween label.

Picture This:
Stacked jars of candy corn lined up like a rainbow of spooky sweetness.


15. Bat Wall Art

Instantly transform plain walls into a bat-filled Halloween scene.

What You Might Need:

  • Black cardstock

  • Scissors

  • Double-sided tape

How-To Steps:

  1. Cut out bats of various sizes.

  2. Tape them to walls in flying patterns.

  3. Layer for depth and movement.

Picture This:
A wall alive with bats in mid-flight, giving any room a thrilling Halloween vibe.


About Us

Welcome to Hope and Daisies! I’m Lisa, a storyteller, creator, and encourager at heart. This space is where I share my love for faith, creativity, and everyday living—from DIY décor projects and home inspiration to uplifting reflections that brighten your day. My hope is that when you visit, you’ll leave with fresh ideas, renewed encouragement, and maybe even a smile. 🌸

Life can be busy, but I believe there’s always room for beauty, faith, and joy in the little things. Thanks for being here—I’m so glad we’re on this journey together!

Newsletter