Reviewed by
Lisa Maslyk
I have reviewed over 1000's of products for beauty, fashion, health and wellness, and home http://More%20about%20me →
✨ Introduction
Have you ever looked at an empty cereal box, a jar, or even a toilet paper roll and wondered what you could make with it? Crafting with recycled items is one of the easiest—and cheapest—ways to get creative. Not only do you save money, but you also help the planet by giving everyday items a brand-new life.
This blog will show you 10 fun and simple recycled crafts anyone can make. You don’t need fancy supplies—just some scissors, glue, and things you probably already have around the house. Whether you’re a beginner crafter, a parent looking for fun with the kids, or just someone who loves turning “trash” into treasure, these projects are for you.
Crafting isn’t about being perfect. It’s about having fun, trying something new, and enjoying the process. So grab that old jar, cardboard tube, or magazine, and let’s get started on some easy recycled crafts that will make your rainy day a little brighter!
📝 Disclosure
This post may contain affiliate links, which means I may earn a small commission (at no extra cost to you) if you purchase something through the links I share. I only recommend products I personally find useful for these crafts.
Some parts of this blog were created with the help of AI writing tools to make instructions easier to follow. All ideas, crafts, and reviews are my own.
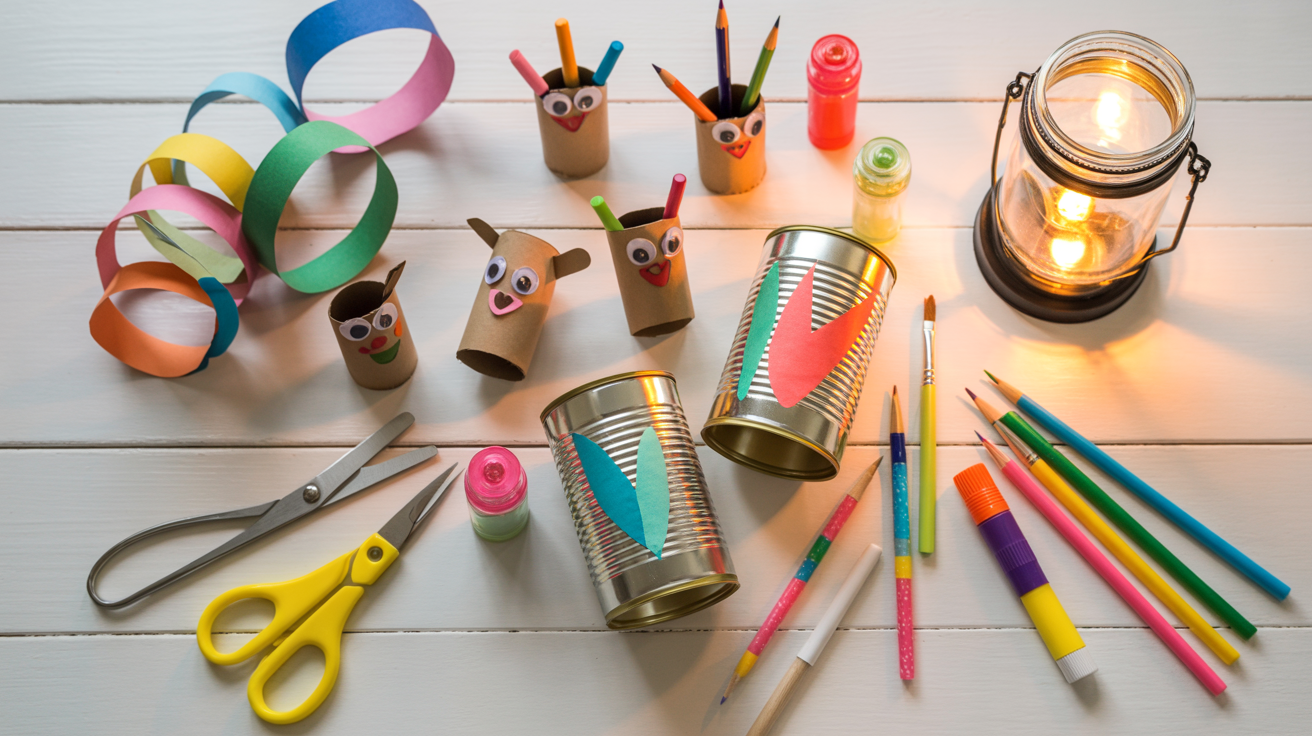
1.🖍️ Tin Can Pencil Holder
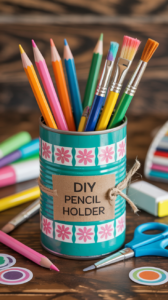
Why Make Them?
Have too many pens, pencils, or paintbrushes rolling around your desk? A tin can pencil holder is the perfect solution! It’s simple, useful, and a great way to recycle something you’d normally throw away. Plus, you can decorate it any way you like—making it one-of-a-kind and extra fun to show off.
🛒 Supplies You’ll Need:
-
Empty tin can (soup or vegetable can, washed and label removed)
-
Craft paper, fabric, or paint (to decorate)
-
Glue stick or Mod Podge
-
Scissors
-
Paintbrush (if painting)
-
Stickers, washi tape, or markers (optional, for extra flair)
🪄 Instructions (Step-by-Step):
-
Prepare the Can:
-
Make sure your tin can is clean and dry.
-
If the edges are sharp, ask an adult to file them down or cover the inside rim with tape for safety.
-
-
Choose Your Look:
-
Decide if you want to paint your can, cover it with paper, or wrap it in fabric.
-
-
Decorate:
-
For Paint: Use acrylic paint and let it dry before adding designs.
-
For Paper/Fabric: Cut a piece the same height as your can, wrap it around, and glue it in place.
-
Add stickers, doodles, or washi tape to make it uniquely yours.
-
-
Let It Dry:
-
If you used glue or paint, let everything dry completely before using.
-
-
Fill It Up:
-
Add your pencils, pens, markers, or even makeup brushes. You now have a personalized pencil holder!
-
🌟 Encouraging Words:
See how easy that was? You just turned something headed for the recycling bin into something useful and stylish. Don’t worry if it’s not “perfect”—crafting is about creativity, not perfection. Every little brush stroke, sticker, or doodle makes your pencil holder special and unique, just like you.
Creative Uses:
-
Make a set for holding crayons, paintbrushes, or scissors.
-
Create a themed holder for school supplies, makeup, or kitchen utensils.
-
Gift one to a friend or teacher—they’ll love a handmade organizer!
🐻 2. Cardboard Tube Animals
Why Make Them?
Cardboard tubes (like toilet paper rolls or paper towel rolls) are one of the easiest and most fun materials to craft with. Instead of throwing them away, you can turn them into cute animals—like owls, cats, bunnies, or even a whole zoo! This craft sparks imagination, helps kids practice creativity, and is a fun way to recycle.
🛒 Supplies You’ll Need:
-
Empty cardboard tubes (toilet paper or paper towel rolls)
-
Colored paper or construction paper
-
Glue stick or tape
-
Scissors
-
Markers or crayons (for drawing faces and details)
-
Googly eyes, buttons, or stickers (optional)
🪄 Instructions (Step-by-Step):
-
Pick Your Animal:
-
Decide what animal you’d like to make—an owl, a puppy, a cat, or even a giraffe.
-
-
Prepare the Tube:
-
Leave the tube plain or cover it with colored paper by wrapping and gluing it in place.
-
-
Shape the Features:
-
For ears, fold the top edges of the tube inward (great for owls and cats).
-
For wings, tails, or arms, cut shapes out of construction paper and glue them to the sides.
-
-
Add a Face:
-
Draw on eyes, nose, and mouth with markers.
-
Or glue on googly eyes for a fun touch.
-
-
Decorate:
-
Add stripes, spots, or fur patterns with crayons, paper cutouts, or stickers.
-
-
Let It Dry:
-
Give the glue a few minutes to dry before playing with your new animal friend.
-
🌟 Encouraging Words:
Your cardboard tube animal doesn’t need to look like anyone else’s—this is your creation! Whether your owl has rainbow wings or your puppy has giant ears, every choice makes it special. Be proud of your creativity—you just turned trash into a little treasure.
Creative Uses:
-
Make a whole collection of animals and create a “cardboard zoo.”
-
Use them as puppets for storytelling or pretend play.
-
Turn several animals into party decorations or classroom displays.
-
Fill them with small treats and give them as surprise gifts.
🎨 3. Magazine Collage Art
Why Make Them?
Magazines are full of colorful pictures, words, and patterns just waiting to be reused. Instead of tossing them in the recycling bin, you can cut out your favorite pieces and turn them into creative collages. It’s like making your own art puzzle—no rules, just fun! This craft is perfect for self-expression, and every collage tells a story that’s completely unique.
🛒 Supplies You’ll Need:
-
Old magazines, newspapers, or catalogs
-
Scissors
-
Glue stick
-
Large sheet of paper, cardstock, or cardboard (as the base)
-
Markers, crayons, or pens (for extra doodles and details)
-
Stickers (optional, for extra flair)
🪄 Instructions (Step-by-Step):
-
Gather Magazines:
-
Flip through and tear out pages with colors, words, or pictures you like.
-
-
Cut Out Shapes:
-
Use scissors to cut out people, animals, letters, or fun designs.
-
Don’t worry about cutting perfectly—it all adds to the charm.
-
-
Arrange Your Pieces:
-
Place the cutouts on your base paper without gluing yet.
-
Move things around until you like the layout.
-
-
Glue It Down:
-
Once you’re happy with your design, glue each piece onto the paper.
-
Smooth out wrinkles with your fingers as you go.
-
-
Add Details:
-
Use markers or crayons to draw extra doodles, patterns, or borders.
-
-
Let It Dry:
-
Leave it flat for a few minutes to let the glue set.
-
🌟 Encouraging Words:
There’s no wrong way to make a collage—your art is as unique as you are! Whether it’s a funny mix of animals and words, a colorful rainbow of shapes, or a story told through pictures, your creativity shines through. Be proud of the little world you’ve created on paper!
Creative Uses:
-
Make vision boards with pictures of things you love or dream about.
-
Create homemade posters to decorate your bedroom walls.
-
Turn smaller collages into handmade cards.
-
Use collages as a fun classroom or group project.
🕯️ 4. Jar Lanterns
Why Make Them?
Jar lanterns are magical little lights you can make from something as simple as an empty jar. They’re cozy, colorful, and create a warm glow that makes any room feel special. Best of all, you get to decorate them however you like—sparkly, soft, bright, or bold. It’s a craft that feels like making your own little piece of magic.
🛒 Supplies You’ll Need:
-
Empty glass jar (mason jars, pasta sauce jars, or pickle jars work great)
-
Tissue paper or colored paper
-
Scissors
-
Mod Podge or white glue mixed with water
-
Paintbrush or sponge brush
-
Tea light candle or LED candle (safe option for kids)
-
Ribbon, twine, or stickers (optional for decoration)
🪄 Instructions (Step-by-Step):
-
Prepare the Jar:
-
Wash and dry your jar so it’s clean and free of labels.
-
-
Choose Your Design:
-
Decide on a look—solid colors, patterns, or a mix of tissue paper for a stained-glass effect.
-
-
Cut the Paper:
-
Cut tissue paper into small squares, strips, or shapes (like stars or hearts).
-
-
Apply Glue:
-
Using your brush, coat a small section of the jar with Mod Podge or watered-down glue.
-
-
Add Tissue Paper:
-
Stick the pieces onto the jar, overlapping them slightly.
-
Brush more glue on top to seal them down.
-
-
Decorate the Top (Optional):
-
Tie a ribbon or twine around the jar’s neck.
-
Add stickers or glitter for extra sparkle.
-
-
Light It Up:
-
Place a tea light or LED candle inside.
-
Watch your jar glow beautifully!
-
🌟 Encouraging Words:
Isn’t it amazing how an old jar can turn into something so magical? Every lantern is different, and that’s what makes yours special. Don’t stress about neat edges or perfect patterns—when the light shines through, it all looks beautiful. You just created your own little glow of happiness!
Creative Uses:
-
Use as night lights in bedrooms.
-
Decorate your table for holidays or special dinners.
-
Give them as handmade gifts.
-
Make a set of lanterns for your porch or backyard.
📦 5. Cereal Box Organizers
Why Make Them?
Instead of tossing out empty cereal boxes, why not turn them into handy organizers? They’re perfect for holding notebooks, mail, papers, or even craft supplies. With just a little cutting and decorating, you can create something that’s both useful and fun. It’s a great way to recycle and keep your space tidy at the same time!
🛒 Supplies You’ll Need:
-
Empty cereal box (any size)
-
Scissors or craft knife (ask an adult for help if using a knife)
-
Ruler and pencil
-
Decorative paper, wrapping paper, or fabric
-
Glue stick or Mod Podge
-
Markers, stickers, or washi tape (optional for decorating)
🪄 Instructions (Step-by-Step):
-
Prepare the Box:
-
Open the top flaps of your cereal box and make sure it’s empty and clean.
-
-
Mark the Shape:
-
Use a ruler and pencil to draw a diagonal line across the front of the box (this creates a slanted opening, like a magazine holder).
-
-
Cut the Box:
-
Carefully cut along the line with scissors.
-
Repeat on the other side so both edges match.
-
-
Cover the Box:
-
Wrap the outside with decorative paper, wrapping paper, or fabric.
-
Use glue to smooth down the edges.
-
-
Decorate:
-
Add washi tape borders, stickers, or draw patterns with markers.
-
-
Let It Dry:
-
Give the glue a few minutes to dry before filling it up.
-
🌟 Encouraging Words:
Look at that—you just made your own organizer from something you might have thrown away! It doesn’t have to be perfect; even the quirks make it yours. Every time you put a paper or notebook inside, you’ll know you created something useful and beautiful with your own hands.
Creative Uses:
-
Store homework, mail, or magazines.
-
Make several to organize craft supplies, coloring books, or notebooks.
-
Use smaller boxes (like snack boxes) for desk organizers.
-
Create a matching set for your desk or study corner.
🧲 6. Bottle Cap Magnets
Why Make Them?
Bottle cap magnets are tiny, fun crafts that bring a pop of creativity to your fridge, locker, or whiteboard. They’re quick to make, easy to personalize, and a great way to reuse something you’d normally toss. Best of all, you can turn them into little works of art—cute animals, smiley faces, or even mini photo frames!
🛒 Supplies You’ll Need:
-
Clean metal or plastic bottle caps
-
Small round magnets (craft store or online)
-
Strong craft glue or hot glue (ask an adult for help if using hot glue)
-
Decorative paper, stickers, or photos (cut to fit inside the cap)
-
Clear Mod Podge or clear-drying glue (to seal)
-
Glitter, buttons, or beads (optional for extra decoration)
🪄 Instructions (Step-by-Step):
-
Prepare the Bottle Caps:
-
Wash and dry your bottle caps so they’re clean.
-
-
Decorate the Inside:
-
Cut small circles of decorative paper or photos to fit inside the cap.
-
Glue them in place.
-
-
Seal the Design:
-
Brush a thin layer of Mod Podge or clear glue on top to protect the design.
-
Add glitter, beads, or stickers if you’d like.
-
-
Attach the Magnet:
-
Glue a magnet to the back of the bottle cap.
-
Press firmly and let it dry completely.
-
-
Test It Out:
-
Stick your new magnet to the fridge or a magnetic board!
-
🌟 Encouraging Words:
See how something so small can become so fun? Every magnet is like a mini piece of art, and there’s no wrong way to decorate them. Whether you make one or a dozen, you’ve just turned a little bottle cap into something useful and creative.
Creative Uses:
-
Decorate your fridge with homemade magnets.
-
Make alphabet or number magnets for kids to play with.
-
Give them as small handmade gifts.
-
Create a collection with different themes—animals, holidays, or favorite colors.
🐦 7. Plastic Bottle Bird Feeder
Why Make Them?
A plastic bottle bird feeder is a fun craft that’s good for the environment and the birds! Instead of throwing away an empty bottle, you can turn it into a snack station for your feathered friends. It’s simple, eco-friendly, and lets you enjoy bird-watching right outside your window.
🛒 Supplies You’ll Need:
-
Empty plastic bottle (water or soda bottle, cleaned and dried)
-
Scissors or craft knife (ask an adult for help)
-
String or twine (to hang the feeder)
-
Wooden spoons, chopsticks, or sticks (for perches)
-
Birdseed
🪄 Instructions (Step-by-Step):
-
Prepare the Bottle:
-
Remove labels and wash the bottle thoroughly.
-
-
Cut Openings:
-
Ask an adult to cut 2–4 small holes near the bottom of the bottle (about the size of a quarter).
-
Cut matching smaller holes just underneath for the perches.
-
-
Add Perches:
-
Slide wooden spoons, chopsticks, or sticks through the holes so they stick out on both sides.
-
These will act as perches for the birds to sit on while eating.
-
-
Fill the Feeder:
-
Pour birdseed into the bottle, filling it about ¾ full.
-
-
Add String:
-
Tie string or twine around the neck of the bottle to hang it.
-
-
Hang It Up:
-
Place your feeder outside on a tree branch or hook and watch the birds enjoy!
-
🌟 Encouraging Words:
How cool is that? You just turned an old bottle into something that helps animals. It doesn’t need to be fancy—the birds don’t mind. They’ll be grateful for your kindness, and you’ll get the joy of seeing them up close. Every little bit helps nature!
Creative Uses:
-
Make more than one and hang them around your yard for different birds.
-
Decorate the outside of the bottle with paint or stickers (just avoid covering the holes).
-
Use smaller bottles for tiny birds and larger ones for bigger flocks.
-
Turn this into a family project—everyone can make their own feeder.
🌸 8. Egg Carton Flowers
Why Make Them?
Egg carton flowers are a cheerful way to recycle something you’d usually throw away. With just a little cutting and painting, the cups of an egg carton can turn into colorful blossoms. They’re fun to make, brighten up any space, and are perfect for kids who love painting and creating!
🛒 Supplies You’ll Need:
-
Empty cardboard egg carton
-
Scissors
-
Paint (acrylic or washable craft paint)
-
Paintbrushes
-
Pipe cleaners, straws, or sticks (for stems)
-
Glue
-
Buttons, beads, or pom-poms (optional for the flower centers)
🪄 Instructions (Step-by-Step):
-
Cut Out the Cups:
-
Cut apart the egg carton so each “cup” section is separate.
-
-
Shape the Petals:
-
Trim the edges of each cup into rounded or pointed petal shapes.
-
-
Paint the Flowers:
-
Paint the cups in bright colors.
-
Let them dry before moving to the next step.
-
-
Add the Centers:
-
Glue a button, bead, or pom-pom inside the middle of each flower for decoration.
-
-
Attach the Stems:
-
Glue a pipe cleaner, straw, or stick to the back of each flower.
-
-
Display Your Bouquet:
-
Once dry, arrange your flowers in a jar, cup, or vase.
-
🌟 Encouraging Words:
See how simple that was? You just turned a plain egg carton into a bouquet of flowers that will never wilt. Each one is different and beautiful—just like real flowers! Be proud of your creativity; you brought new life to something ordinary.
Creative Uses:
-
Display them in a vase as room décor.
-
Make flower magnets by attaching them to bottle caps with magnets on the back.
-
Use them for party decorations or centerpieces.
-
Give them as a handmade gift bouquet to brighten someone’s day.
💿 9. CD Mosaic Coasters
Why Make Them?
Do you have old CDs or DVDs lying around? Instead of tossing them, you can turn them into shiny, colorful mosaic coasters! The broken pieces of CDs reflect light like little rainbows, and when glued onto a base, they make beautiful, one-of-a-kind coasters. It’s a fun way to recycle while creating something useful for your home.
🛒 Supplies You’ll Need:
-
Old CDs or DVDs
-
Scissors (or strong craft shears)
-
Cardboard circles, cork coasters, or jar lids (for the base)
-
Strong craft glue
-
Clear Mod Podge or sealant (to make them waterproof)
-
Felt circles (optional, to protect furniture bottoms)
🪄 Instructions (Step-by-Step):
-
Prepare the CDs:
-
Carefully cut the CDs into small pieces (about ½–1 inch each).
-
Be gentle—some CDs may flake when cut.
-
-
Make the Base:
-
Use a cork coaster, jar lid, or cut a thick cardboard circle about 4 inches wide.
-
-
Arrange the Pieces:
-
Place CD pieces on the base like a mosaic puzzle.
-
Try leaving a little space between pieces for a tiled look.
-
-
Glue Them Down:
-
Once you like the design, glue each piece in place.
-
-
Seal the Surface:
-
Brush a layer of Mod Podge or clear sealant over the top to protect your coaster and give it a smooth finish.
-
-
Add Felt (Optional):
-
Glue a felt circle to the bottom to protect your table.
-
🌟 Encouraging Words:
You just gave old CDs a sparkling new life! Don’t worry if the pieces aren’t cut perfectly—the shine and color will make your coaster look amazing no matter what. Every coaster is unique, and that’s what makes it so special.
Creative Uses:
-
Make a matching set of coasters for your coffee table.
-
Give them as handmade gifts for family or friends.
-
Use larger bases to create mosaic trivets for hot pans.
-
Mix CD pieces with beads or sequins for extra sparkle.
📿 10. Recycled Paper Beads
Why Make Them?
Recycled paper beads are a fun way to turn old magazines, newspapers, or scrap paper into colorful jewelry. Each bead is unique, and when strung together, they make beautiful necklaces, bracelets, or even keychains. This craft is relaxing, creative, and a great reminder that something simple—like paper—can become something truly special.
🛒 Supplies You’ll Need:
-
Old magazines, newspapers, or scrap paper
-
Scissors
-
Ruler and pencil
-
Glue stick
-
Toothpick, straw, or skewer (for rolling the beads)
-
String, elastic cord, or yarn (for threading)
-
Clear nail polish or Mod Podge (to seal and strengthen the beads)
🪄 Instructions (Step-by-Step):
-
Cut Strips of Paper:
-
Cut long, skinny triangles from your paper (about 1 inch wide at the base, tapering to a point).
-
Different sizes will make different shaped beads.
-
-
Start Rolling:
-
Place the wide end of a strip on a toothpick or straw.
-
Roll it tightly toward the pointed end.
-
-
Glue the End:
-
Dab glue on the tip and press it down to secure the bead.
-
-
Seal the Bead:
-
Brush a layer of clear nail polish or Mod Podge over the bead to make it shiny and durable.
-
Let it dry completely before removing it from the toothpick.
-
-
Make More Beads:
-
Repeat with different colors and patterns for variety.
-
-
Thread Them Together:
-
Once you have enough beads, string them onto yarn, elastic cord, or thread to make bracelets, necklaces, or keychains.
-
🌟 Encouraging Words:
Look at you—you just transformed scrap paper into jewelry! Each bead is like a tiny piece of art, and the best part is that no two will ever look exactly alike. Wear your creation proudly or share it with someone you love. Handmade things always carry extra meaning.
Creative Uses:
-
Make friendship bracelets or necklaces.
-
Create keychains or bag charms.
-
Use beads in art projects, like decorating frames or jars.
-
Sell or gift your jewelry as eco-friendly treasures.
🌟 Conclusion
See how easy it is to turn everyday “trash” into treasures? With just a little imagination, you made organizers, lanterns, bird feeders, and even jewelry—all from items that might have ended up in the recycling bin. These crafts aren’t just fun and affordable—they also help the planet and let your creativity shine.
Remember, crafting is not about perfection. It’s about having fun, trying new things, and making something that feels special to you. Every little project is a win, no matter how simple.
If you enjoyed these recycled crafts, don’t stop here—there are so many more ideas waiting for you! Check out my other blog posts, like 10 Easy Paper Crafts Anyone Can Make, for even more simple, creative projects you can try at home.
Happy crafting—you’ve got everything you need to make something amazing!
About the reviewer
Lisa Maslyk
I have reviewed over 1000's of products for beauty, fashion, health and wellness, and home
More reviews you'll want to read
DIY Mother’s Day Fabric Gifts: 10 Easy Ideas
Read review →
10 Brilliant Craft Room Organization Ideas: How to Create a Beautiful, Functional Creative Space
Read review →
Seasonal Diy Projects: Seasonal Crafts for Every Holiday
Read review →
Transform Snow Days with 15 Creative Crafts to Keep Kids Joyfully Engaged Indoors!
Read review →
Bright Ideas: Chic DIY Gifts and Cards for Teachers
Read review →
10 Easy Paper Crafts Anyone Can Make
Read review →