
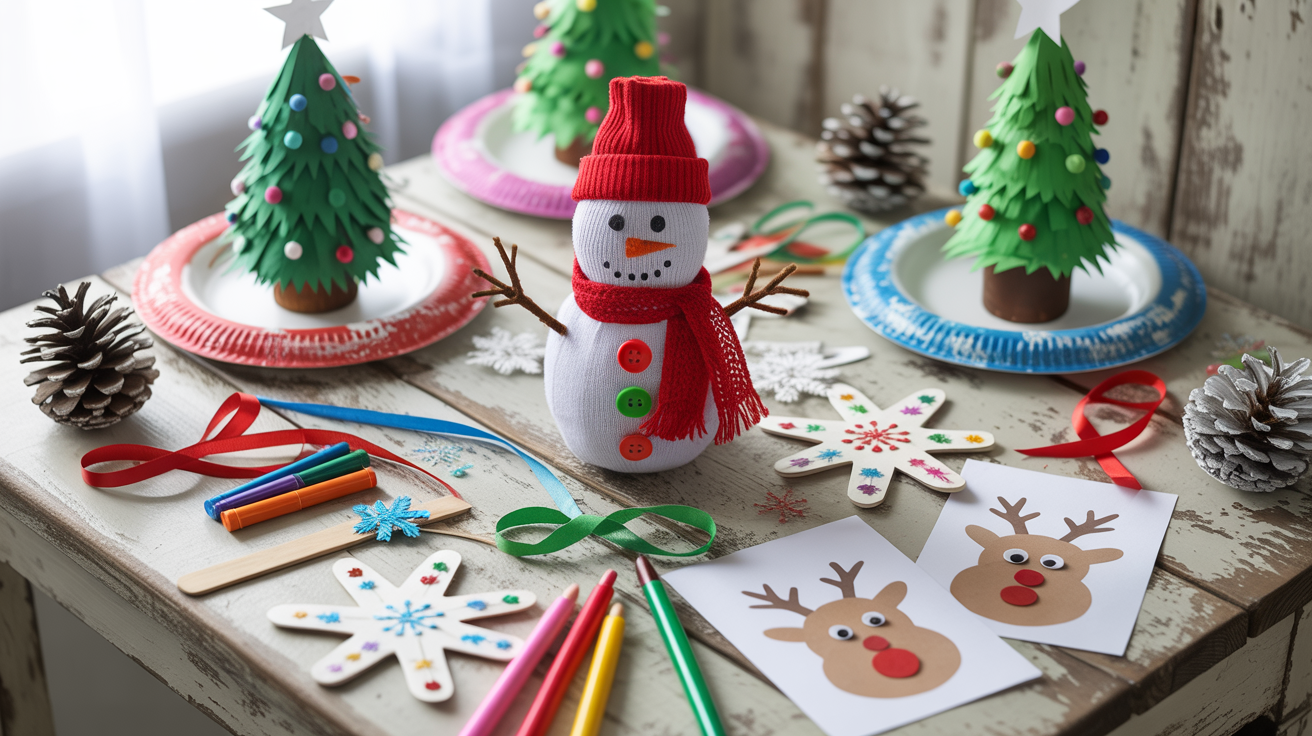
✨ Introduction
Christmas is the perfect time to pause, gather the family, and dive into some creative fun. With twinkling lights, cozy nights, and holiday music filling the air, crafting becomes an enchanting experience. DIY Christmas crafts are more than just projects; they’re opportunities to create cherished memories, share laughter over little messes, and make keepsakes to treasure for years. The beauty of these activities is their simplicity—no need for costly supplies or expert skills. Many projects can be completed with items already at home, like paper plates and popsicle sticks. Whether you’re crafting ornaments for the tree, small gifts for grandparents, or simply looking for a joyful snow day activity, these crafts are easy, affordable, and brimming with holiday spirit. So, roll up your sleeves, sprinkle some magic, and get ready for 10 fun and easy DIY Christmas crafts for kids!
📝 Disclosure
This post may contain affiliate links. That means if you click and purchase through one of these links, I may earn a small commission at no extra cost to you. As an Amazon Associate, I earn from qualifying purchases. Some content in this post was created with the help of AI.
🎄 1. Paper Plate Christmas Trees
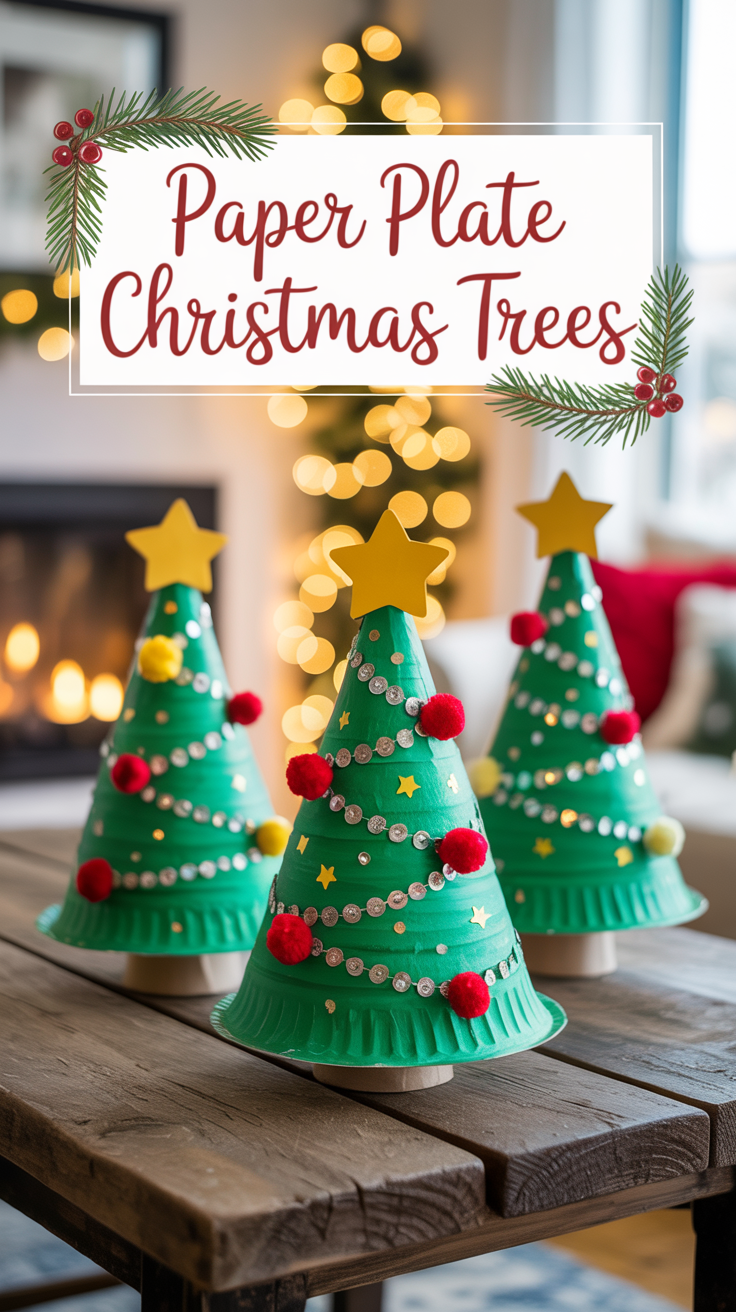
Christmas trees are one of the most magical parts of the holiday season. The twinkling lights, colorful ornaments, and sparkling tinsel always make a room feel cozy and bright. But what if you could make your very own mini tree—one that you get to design from top to bottom? With just a simple paper plate, some paint, and a few decorations, you can create a Christmas tree that’s totally unique and 100% you. The best part? You don’t need to buy anything fancy. This craft is quick, easy, and fun enough to keep kids busy on a snowy afternoon. Plus, when you’re done, you’ll have adorable little trees to decorate your room, give as gifts, or even use as table decorations for Christmas dinner.
Materials Checklist:
-
Paper Plates (plain white) — sturdy plates are best for cutting and painting
-
Green Paint, Crayons, or Markers — for coloring your Christmas trees
-
Scissors — child-safe for easy cutting
-
Glue or Tape — to hold decorations in place
-
Pom-Poms, Sequins, Buttons, Stickers, or Glitter — for ornaments and sparkle
-
Yellow Paper or Star Stickers — to top each tree with a shining star
How to Make It:
-
Cut Your Plate: Fold a paper plate in half, then cut it into three “pie slice” shapes. Each slice will become one Christmas tree.
-
Paint It Green: Use green paint, crayons, or markers to color your trees. Let them dry if you used paint.
-
Decorate: Glue on pom-poms, sequins, buttons, or stickers for ornaments. Add a touch of glitter for sparkle!
-
Add the Star: Cut a star from yellow paper (or use a star sticker) and glue it to the top of your tree.
-
Show It Off: Once dry, tape it to cardboard so it stands up, hang it on the wall, or line up your mini forest on a shelf!
Dos & Don’ts
Do use thicker plates — they’ll hold their shape better.
Don’t skip drying time between paint and glue.
Do let kids decorate with any materials they have at home.
Don’t forget to write the year on the back for keepsakes!
💡 Fun Tip:
Make a set of different-sized trees and use them as decorations for your Christmas table. You could even write names on each one and turn them into personalized place cards!
❄️ 2. Popsicle Stick Snowflakes
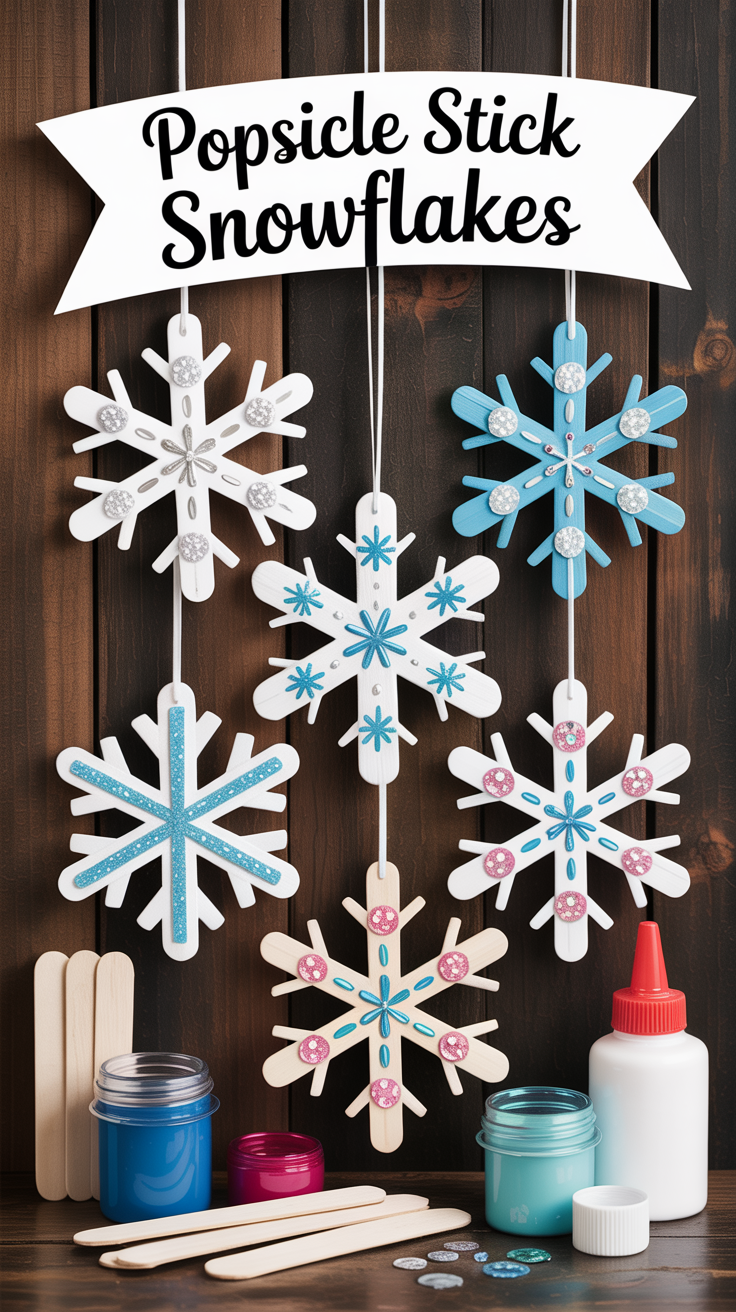
Snowflakes are one of the prettiest parts of winter—no two are ever the same! With this craft, you get to make your own snowflakes using popsicle sticks, paint, and a little imagination. The best part? These snowflakes won’t melt, and you can decorate them any way you like. Hang them on the tree, tape them to the windows, or string them together to make a frosty garland. It’s a simple, colorful project that brings a little bit of winter wonder right into your home.
🛒 What You’ll Need:
✨ How to Make It:
-
Make the snowflake shape: Glue 3 or 4 popsicle sticks together in the middle to make a star or “snowflake” shape. Let it dry.
-
Paint your snowflake: Cover your sticks with white, silver, or blue paint. Add extra coats if you want it bright.
-
Decorate: Sprinkle glitter on while the paint is still wet, or glue on sequins, rhinestones, or stickers to make your snowflake shine.
-
Add a hanger: Tie a piece of ribbon or string around one end so you can hang it up.
-
Display: Hang it on your Christmas tree, in the window, or make a bunch to decorate your room!
💡 Fun Tip:
No two snowflakes in nature are alike, so don’t be afraid to get creative! Try different numbers of sticks, mix up the colors, or even paint rainbow snowflakes.
🦌 3. Handprint Reindeer Cards

Nothing says “Merry Christmas” like a homemade card, and this one comes with a special touch—your very own handprint! By tracing your hand, you can turn it into a reindeer with antlers, a shiny red nose, and a big holiday smile. These cards are perfect for giving to family, teachers, or friends, and they’ll treasure the fact that you made it yourself. Plus, you’ll love looking back at how small your hand was in years to come—it’s like a holiday keepsake and a card all in one.
🛒 What You’ll Need:
✨ How to Make It:
-
Trace your hand: Place your hand on brown construction paper and trace around it with a pencil. This will be the reindeer’s antlers.
-
Cut it out: Carefully cut out the handprint shape.
-
Make the reindeer’s face: Cut an oval or circle from another piece of brown paper for the head.
-
Assemble the reindeer: Glue your handprint (antlers) to the top of the oval (head). Add googly eyes and a red pom-pom (or color in a red nose).
-
Make it a card: Fold a piece of cardstock or construction paper in half. Glue your reindeer to the front.
-
Add your message: Write a holiday greeting inside like “Merry Christmas!” or “You’re ‘deer’ to me!”
💡 Fun Tip:
Make a whole herd! Use different family members’ handprints for antlers—big ones for dad, medium for mom, small for kids—and line them up to make a reindeer family card.
⛄ 4. Mason Jar Snow Globes
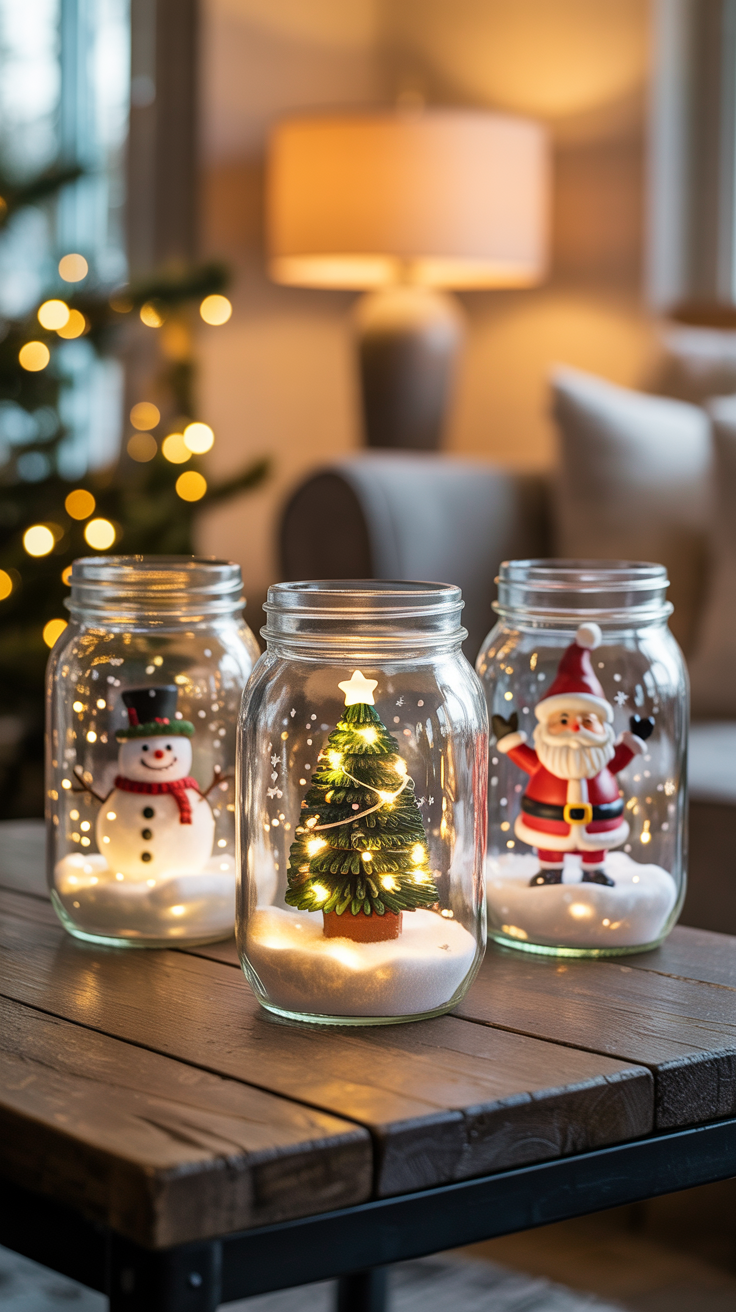
Snow globes are like little worlds you can hold in your hands—shake them up, and suddenly it’s snowing inside! With this craft, you can make your very own snow globe using a mason jar, some glitter, and a tiny holiday figurine. It’s a magical project that kids love because every shake feels like winter wonderland magic. These snow globes make adorable decorations, and they’re also wonderful handmade gifts for grandparents, teachers, or friends.
🛒 What You’ll Need:
-
A mason jar with a lid (plastic jars work too if you want a safer option for kids)
-
Small waterproof figurines (like a tiny Santa, snowman, or Christmas tree)
-
Water
✨ How to Make It:
-
Pick your figurine: Choose a small holiday toy or decoration that will fit inside the jar when it’s closed.
-
Glue it down: With an adult’s help, glue your figurine to the inside of the jar lid. Let it dry completely.
-
Fill the jar: Pour water into the jar until it’s almost full. Add a spoonful of glitter and a few drops of glycerin if you have it (this makes the glitter “snow” more slowly).
-
Close it up: Screw the lid on tightly with your figurine inside the jar. You might want to add extra glue around the edge to prevent leaks.
-
Shake and enjoy: Turn it over, give it a shake, and watch the snow swirl around your little holiday scene!
💡 Fun Tip:
Try making a whole set of snow globes with different themes—like one with a tree, one with a snowman, and one with Santa. Line them up on a windowsill or shelf for a magical snowy display.
🎅 5. Toilet Paper Roll Santas
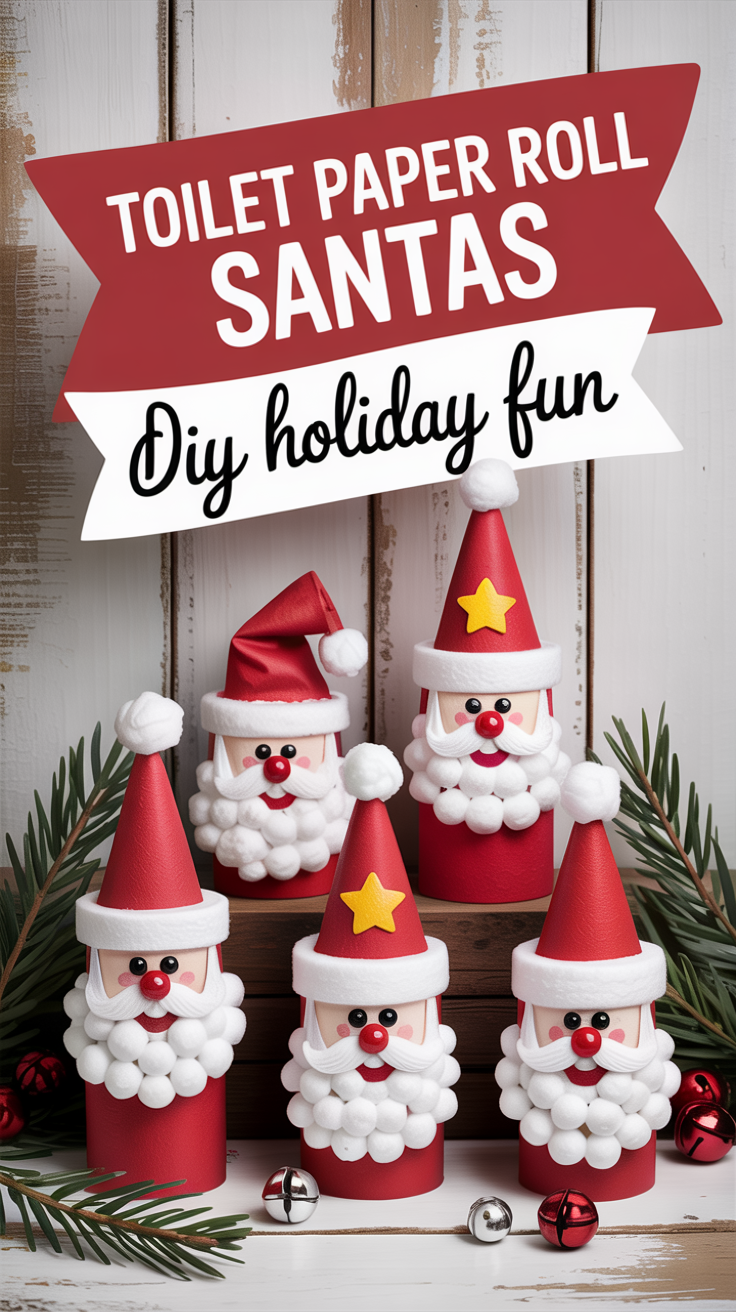
Who knew something as simple as an empty toilet paper roll could turn into Santa Claus himself? This craft is super fun because you get to build Santa’s red suit, fluffy beard, and cheerful face all from scratch. Kids love this project because every Santa turns out a little different—some with silly beards, some with tall hats, and some with extra sparkly outfits. Once finished, these Santas can be lined up on a shelf, used as decorations for the Christmas table, or even made into a whole army of little paper roll Santas to spread holiday cheer around the house.
🛒 What You’ll Need:
✨ How to Make It:
-
Make Santa’s suit: Wrap the toilet paper roll in red construction paper or paint it red. Let it dry if painted.
-
Add the belt: Cut a thin strip of black paper and glue it around the middle of the roll. Cut out a small square of yellow or gold paper and glue it in the center as the belt buckle.
-
Give him a beard: Stretch out some cotton balls and glue them to the bottom of the roll for Santa’s fluffy beard.
-
Make his hat: Roll a triangle of red paper into a cone shape and glue it to the top of the roll for Santa’s hat. Add a cotton ball at the tip and a strip of cotton along the bottom for trim.
-
Add the face: Draw eyes and a smile with a marker, or glue on googly eyes. You can also add a tiny red pom-pom for his nose!
-
Show him off: Stand your Santa up on a table, shelf, or windowsill and enjoy your very own jolly holiday friend.
💡 Fun Tip:
Make a whole collection of Santas with different colored suits—green, blue, or even rainbow—and turn them into a festive holiday parade!
🍪 7. Salt Dough Ornaments

If you love making Christmas cookies, you’ll love this craft too—except these ornaments are for your tree, not your tummy! Salt dough is super simple to make with just a few ingredients from your kitchen. Once you roll it out and cut it into shapes with cookie cutters, you can bake it, paint it, and hang it on your Christmas tree. Each ornament is one-of-a-kind, and the best part is that they last for years, becoming little keepsakes you can pull out every holiday season.
🛒 What You’ll Need:
-
1 cup water
✨ How to Make It:
-
Mix the dough: In a bowl, stir together the flour, salt, and water until it forms a dough. If it’s sticky, add a little more flour.
-
Roll it out: Sprinkle some flour on the table and roll the dough flat—about as thick as a cookie.
-
Cut your shapes: Use cookie cutters to cut out fun Christmas designs. Don’t forget to use a straw to poke a hole near the top of each ornament for hanging.
-
Bake them: Place your ornaments on a baking sheet and bake at 250°F (120°C) for about 2 hours, or until they’re hard and dry. Let them cool completely.
-
Paint and decorate: Once cooled, paint your ornaments with bright holiday colors. Add glitter or write names on them to make them extra special.
-
Add ribbon: Loop a piece of ribbon or string through the hole so you can hang them on the tree.
💡 Fun Tip:
Make a new set every year and write the date on the back. You’ll have a whole collection of handmade ornaments to remember each Christmas by!


⛄ 10. Sock Snowmen
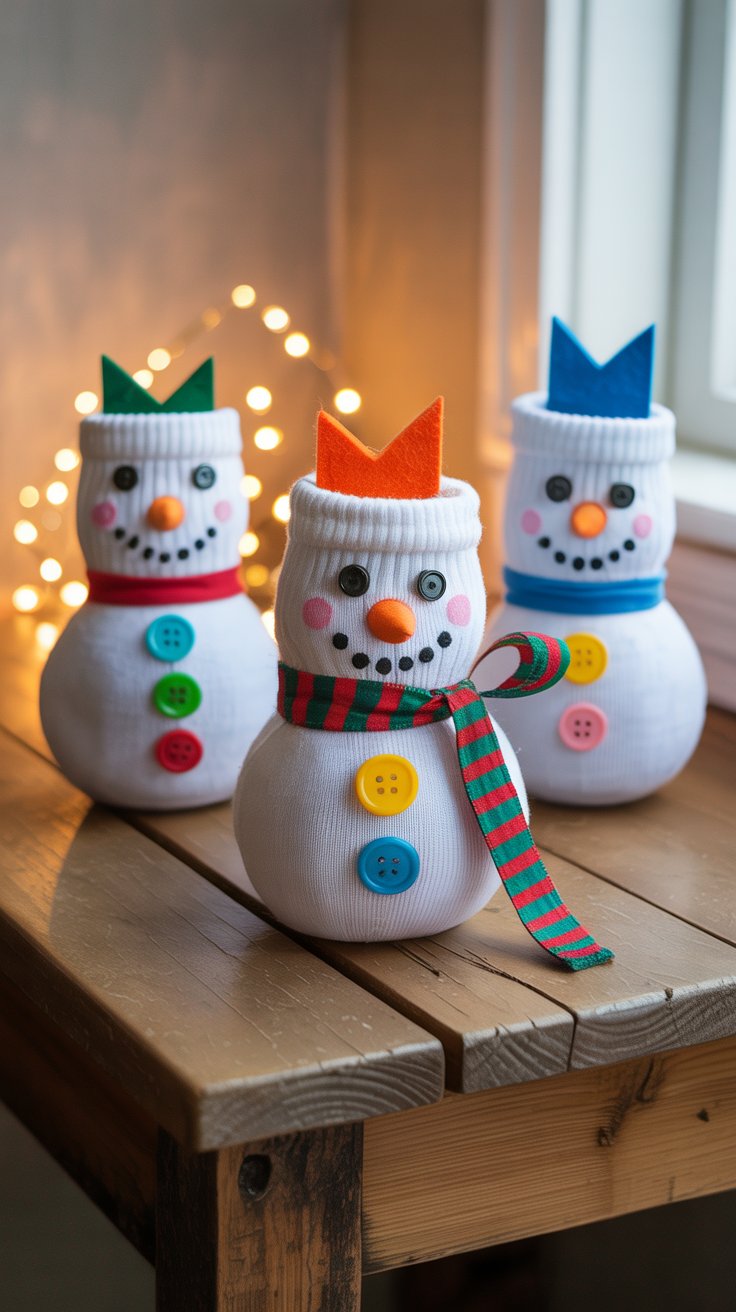
What do you do with those lonely socks that lost their match? Turn them into adorable snowmen! This craft is cozy, squishy, and so much fun because no two snowmen ever look the same. With some rice for stuffing, buttons for detail, and a little ribbon for a scarf, you can build a snowman that won’t ever melt. These make super cute decorations for your room, or you can give them as homemade gifts that are sure to make someone smile.
🛒
Materials Checklist:
-
White Sock (Crew Style) — soft and stretchy works best for shaping your snowman
-
Rubber Bands or String — to section off the snowman’s body and head
-
Buttons — for the front decoration
-
Ribbon or Fabric Scraps — to make a cute little scarf
-
Colorful Sock (for the Hat) — cut the top off to create a cozy winter hat
-
Black Marker or Beads — for eyes and mouth details
-
Orange Felt Sheet — cut into a tiny triangle for the nose (or use an orange marker)
✨ How to Make It:
-
Fill the sock: Pour rice into the white sock until it’s full enough to feel plump.
-
Shape the snowman: Tie off the top of the sock with a rubber band. Then, use another band to pinch the middle, creating a “head” and a “body.”
-
Add the hat: Cut the top off a colorful sock and roll it down over the snowman’s head to make a cozy hat.
-
Give him a scarf: Tie a ribbon or fabric strip around the “neck.”
-
Decorate the face and body: Draw eyes, a carrot nose, and a smile with markers, or glue on beads and felt pieces. Add buttons down the front for extra cuteness.
-
Set him up: Place your snowman on a shelf or windowsill and admire your new frosty friend!
💡 Fun Tip:
Make a whole snowman family! Use different sizes of socks and decorate each one with different scarves and hats.
Looking For More Easy Winter Crafts For Kids? Check out this blog post
🎁 Conclusion
Christmas is about so much more than gifts under the tree—it’s about the laughter, the memories, and the little moments we create together. These 10 DIY Christmas crafts are simple, affordable, and perfect for kids, but the joy they bring lasts long after the glitter settles. Whether you’re making a sock snowman, decorating pinecones, or stamping holiday cards, each project is a chance to slow down and enjoy the season with your family.
So grab your scissors, glue, and a sprinkle of imagination—it’s time to turn everyday supplies into festive treasures. And remember: the best crafts aren’t about perfection, they’re about having fun and making memories that will warm your heart for years to come.
If you enjoyed these holiday projects, be sure to check out my other DIY craft posts for even more creative ideas. Merry Christmas, and happy crafting! 🎄✨


One Response